Matariki craft ideas center on celebrating the Māori New Year through symbolic art, including creating Manu Tukutuku (kites) to connect with the heavens, weaving Harakeke or paper stars to represent the Pleiades cluster, and crafting recycled lanterns to illuminate the winter nights. These activities foster whanaungatanga (togetherness) and help transmit cultural knowledge to tamariki.
The Cultural Significance of Matariki Crafts
Matariki is not merely a date on the calendar; it is a profound seasonal transition in Aotearoa (New Zealand) that marks the rising of the Pleiades star cluster. This period signals the Māori New Year, a time for remembrance, celebrating the present, and looking forward to the future. Engaging in Matariki craft ideas is a powerful way to teach children about these concepts through hands-on learning.
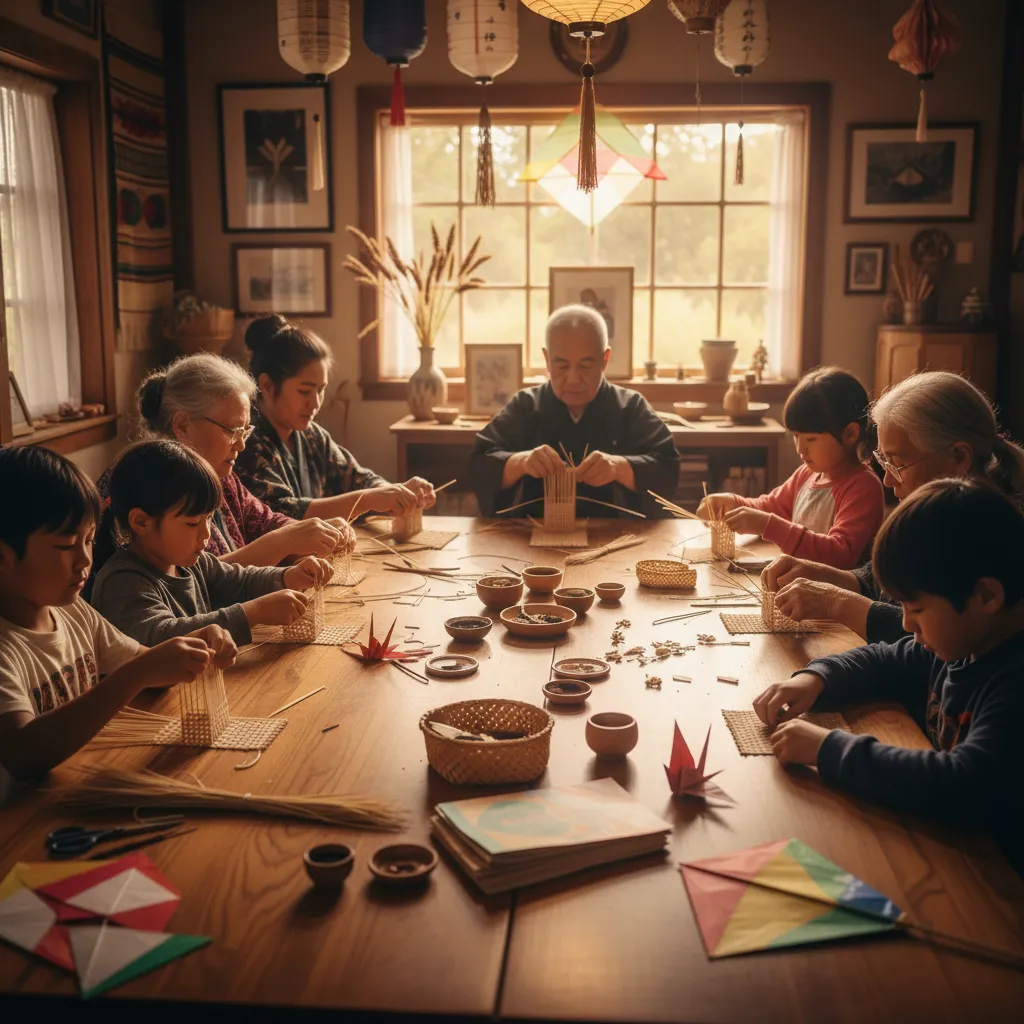
In traditional Māori society, the winter months were a time when the harvest was stored, and whānau (families) would spend more time indoors. This provided the perfect environment for Wānanga—learning and sharing knowledge. By participating in these crafts, parents and educators are not just keeping children busy; they are upholding the tradition of passing down stories and skills. Whether it is the geometry of weaving or the physics of kite flying, every craft carries a narrative connected to the stars.
Making Manu Tukutuku: Traditional Kites
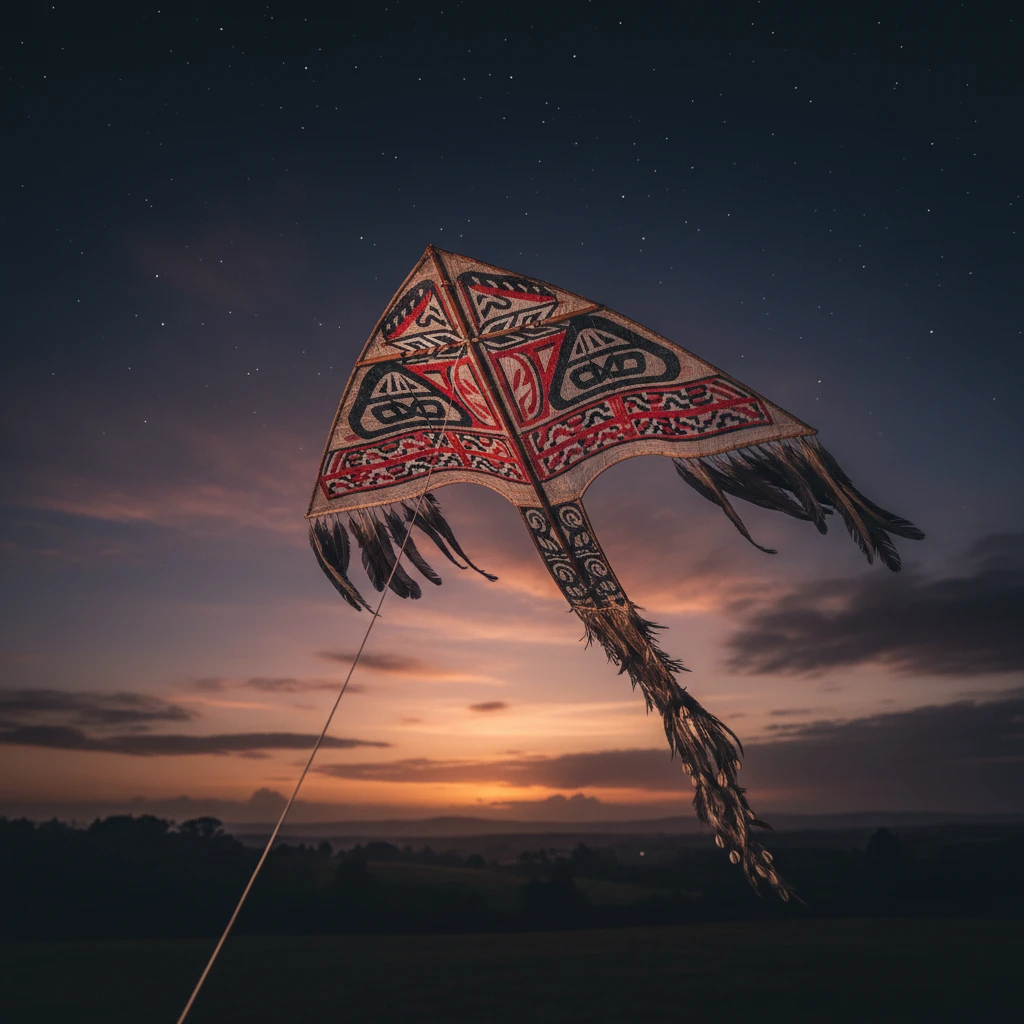
One of the most iconic symbols of Matariki is the Manu Tukutuku, or kite. Historically, kites were flown to tangata whenua (people of the land) to connect the earth and the sky. They were seen as a vehicle to send messages to the gods or to those who have passed on. Crafting a kite during Matariki is a beautiful way to honor those who have departed in the last year while celebrating the joy of the new year.
Materials Needed for a Classroom-Friendly Kite
- Natural items: Toetoe stems, dried flax stalks, or lightweight bamboo garden stakes.
- Covering: Recycled paper, brown packing paper, or lightweight fabric.
- Decorations: Feathers, shells, permanent markers, and paint.
- Binding: Natural twine, jute string, or strong masking tape.
- Tail materials: Strips of fabric or ribbon.
Step-by-Step Construction Guide
1. Create the Frame: Begin by forming a cross shape with two sticks. The vertical stick should be slightly longer than the horizontal one. Secure the intersection tightly with twine using a diagonal lashing technique. This central joint is critical for the kite’s stability.
2. Frame the Perimeter: Run a string around the outer tips of the four sticks. Pull it taut to create a diamond shape and secure it at each tip. This string will support the paper covering.
3. Apply the Skin: Lay your frame onto the paper or fabric. Cut around the frame, leaving a 3cm margin. Fold this margin over the string perimeter and glue or tape it down securely.
4. Decorate with Meaning: This is where the Matariki craft ideas come to life. Encourage children to draw symbols representing their hopes for the coming year or illustrations of the nine stars of Matariki. Attaching feathers (huruhuru) to the spine adds a traditional aesthetic.
5. Attach the Bridle and Tail: Tie a string to the top and bottom of the vertical spine to create a bridle. Attach your flying line to this bridle. Finally, add a long tail to the bottom; the tail provides drag and stability, preventing the kite from spinning out of control.
Recycled Material Lanterns for the Winter Night
Matariki occurs during the middle of winter in the Southern Hemisphere. As such, festivals of light are a common way to celebrate. Creating lanterns symbolizes bringing light into the darkness and can be associated with the star Waipuna-ā-rangi (connected to rain) and Ururangi (connected to wind), braving the elements to find warmth.
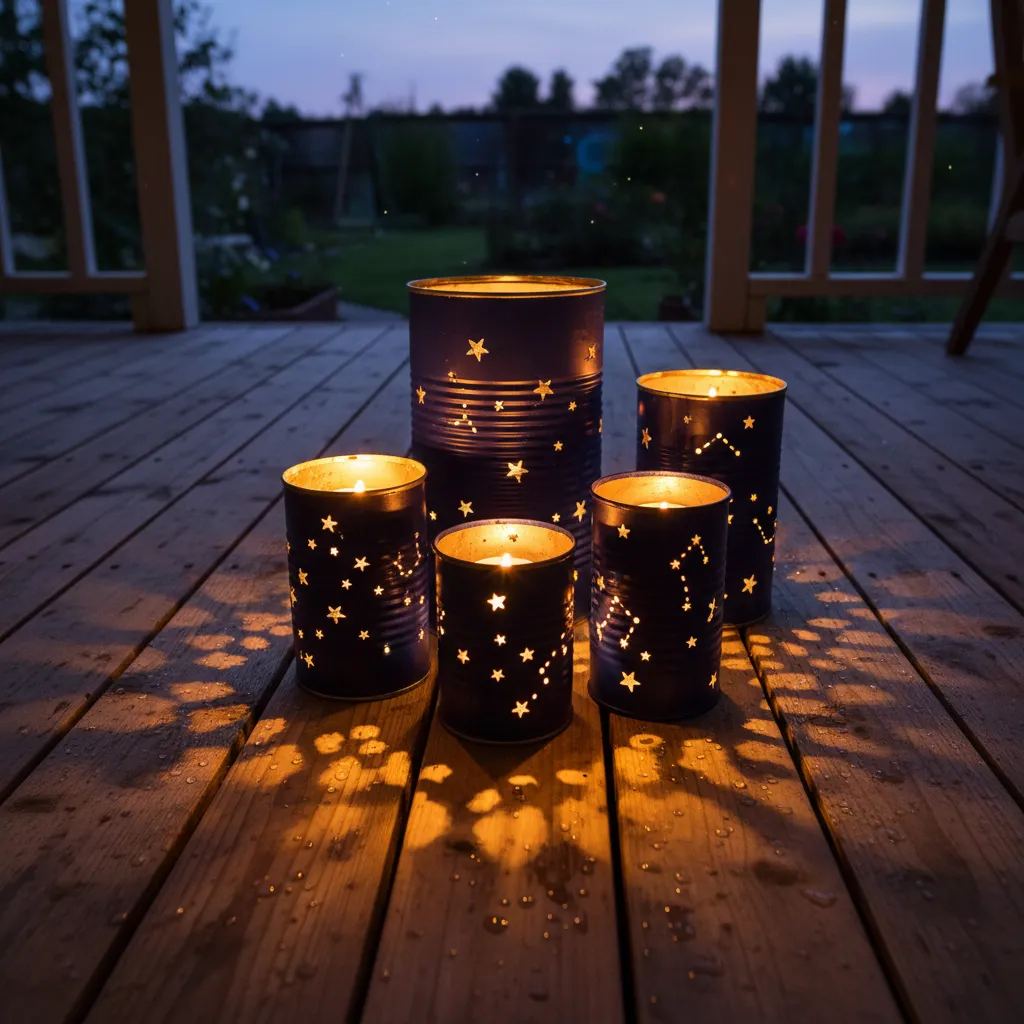
The Tin Can Constellation Project
This project is excellent for older primary school children and emphasizes sustainability—a core tenet of the Māori worldview (Kaitiakitanga).
Preparation: Clean recycled tin cans thoroughly and remove any sharp edges. Fill the cans with water and freeze them solid. The ice prevents the can from denting when you punch holes in it.
Execution: Have students draw a constellation pattern on a piece of paper—ideally the Matariki cluster. Tape the paper around the frozen can. Using a hammer and a large nail, gently punch holes through the dots in the pattern. Once the design is complete, let the ice melt and dry the can.
Finishing Touches: Paint the exterior of the can in deep blues, purples, and blacks to represent the night sky. Place a tea light or LED candle inside. When lit, the “stars” will project onto the surrounding walls, creating a magical atmosphere.
Star Weaving Tutorials: Mastering the Whetū
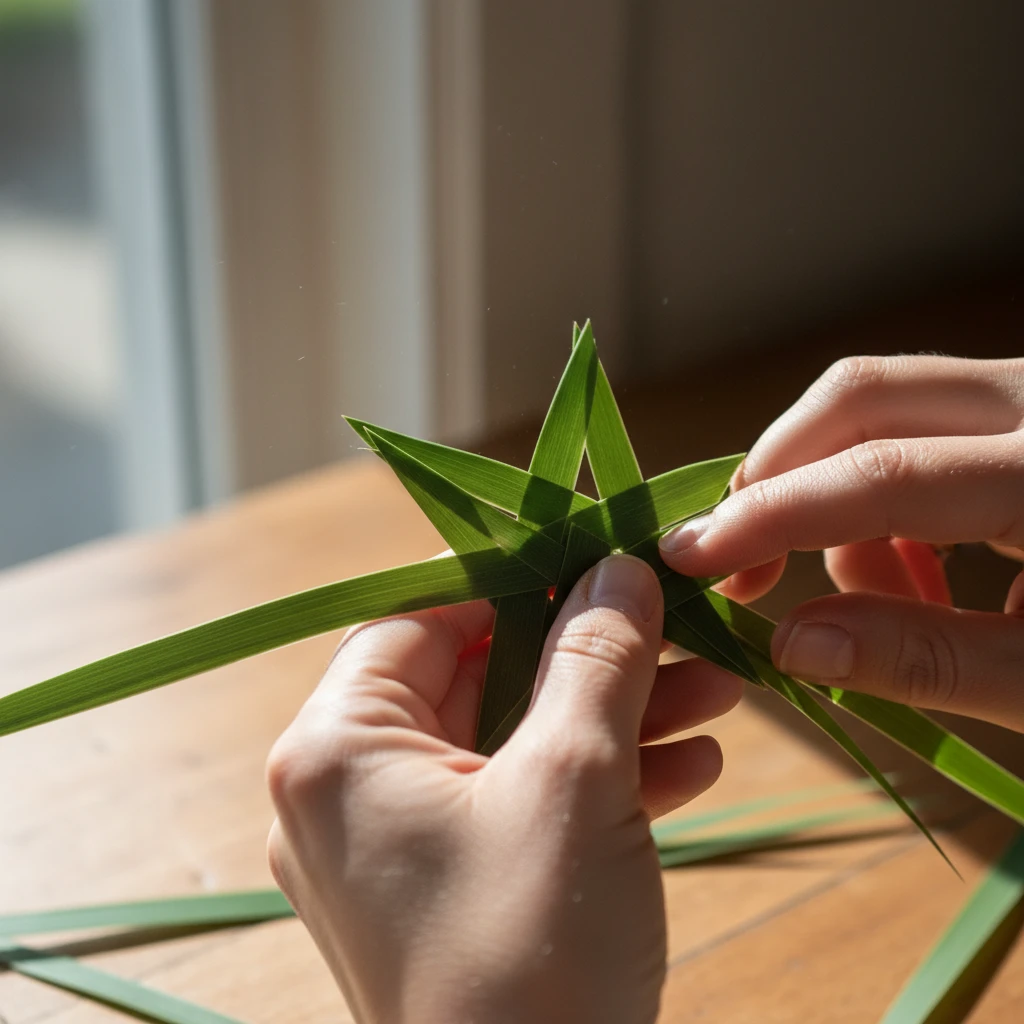
Weaving (Raranga) is a highly respected art form in Māori culture. While traditional weaving uses Harakeke (flax), beginners and young children can practice these Matariki craft ideas using paper strips, ribbon, or synthetic weaving strips. The goal is to create an eight-pointed star, representing the brilliance of the cluster.
How to Make a Paper Woven Star (Putiputi)
This activity requires patience and fine motor skills, making it suitable for ages 8 and up.
1. Prepare the Strips: You will need four long strips of paper (approx 1cm wide and 30cm long). Fold them in half to find the midpoint.
2. The Lock: Interlock the four strips at their folded centers to create a woven square center. This is often the hardest part; ensure the strips are pulled tight so there is no gap in the middle.
3. Weaving the Points: Take the top layer of one strip and fold it backward and to the right to create a triangular point. Fold it again to complete the point shape, then tuck the loose end under the woven center square to lock it in place. Repeat this for all four sides.
4. The 3D Effect: Flip the star over and repeat the process on the back. For advanced crafters, you can pull the strips through the center gently to create a cone shape, giving the star a 3D effect known as a Whetū.
Displaying Your Stars: Create a mobile by hanging 7 or 9 stars from a piece of driftwood. This makes for a stunning classroom display or home decoration that honors the celestial origins of the holiday.
Safe and Sensory Matariki Activities for Toddlers
For ECE (Early Childhood Education) centers and parents of toddlers, complex weaving or kite construction may be too advanced. However, Matariki craft ideas can be adapted to focus on sensory play, shapes, and colors. The focus here is on participation and exposure to cultural concepts.
Matariki Playdough Mats
Create laminated mats featuring the outline of the Matariki stars. Provide children with black playdough (representing the night sky) mixed with biodegradable glitter. Ask the tamariki to roll small balls of yellow or white dough to place on the stars. This helps with counting skills and fine motor development while introducing the concept of the star cluster.
Finger Painting the Night Sky
Use a large sheet of black cardstock. Provide non-toxic paints in silver, gold, and white. Allow toddlers to use their fingers or sponge stamps to create their own night sky. While they paint, play traditional Māori waiata (songs) in the background to create an immersive cultural environment.
Natural Material Collages
Take the toddlers on a nature walk to collect fallen leaves, twigs, and feathers. This connects to the star Tupu-ā-nuku, which is associated with food that grows in the ground and nature. Back in the classroom, help them glue these items onto a star-shaped cardboard cutout. This reinforces the connection between the stars and the earth.
Integrating Crafts with Matariki Legends
To maximize the educational value of these Matariki craft ideas, it is essential to pair the activity with the story. When making kites, tell the story of Tāwhaki attempting to climb to the heavens. When weaving stars, discuss Hiwa-i-te-rangi, the wishing star.
By intertwining the physical act of crafting with the oral history of Māori legends, you provide a holistic learning experience. This ensures that the crafts are not just aesthetic objects, but vessels of cultural transmission that respect and honor the indigenous history of Aotearoa.
What are the 9 stars of Matariki?
The nine stars are Matariki (the mother), Pōhutukawa, Tupu-ā-nuku, Tupu-ā-rangi, Waipuna-ā-rangi, Waitī, Waitā, Ururangi, and Hiwa-i-te-rangi. Each star holds dominion over a specific environmental element, such as fresh water, salt water, wind, or crops.
Why do we fly kites during Matariki?
Kites, or Manu Tukutuku, are flown to symbolically connect the earth and the heavens. They are believed to carry messages to ancestors who have passed away and to the gods. The closer the kite flies to the stars, the stronger the connection.
What materials are best for sustainable Matariki crafts?
To align with the value of Kaitiakitanga (guardianship), use natural or recycled materials. Harakeke (flax), raupo, driftwood, recycled cardboard, glass jars, and biodegradable twine are excellent choices that minimize environmental impact.
How can I teach Matariki to toddlers?
Focus on sensory experiences and simple concepts. Use songs (waiata), light and dark play, star-shaped cookie cutters, and nature walks. Keep explanations simple: “Matariki is a time to say happy birthday to the stars and hug our family.”
Is Matariki the same date every year?
No, Matariki follows the lunar calendar (Maramataka). It generally occurs in late June or July. The specific dates for the public holiday in New Zealand shift slightly each year to align with the rising of the stars and the moon phases.
What colors represent Matariki?
Common colors include black and dark blue (the night sky), silver and gold (the stars), and earth tones like green and brown to represent Papatūānuku (Earth Mother) and the harvest associated with the New Year.